Beginner Travel Photography Tips: Capture Stunning Memories

There’s nothing quite like hitting the road and seeing the world, and for many of us, the urge to capture those fleeting moments in breathtaking photographs is simply irresistible. However, for newcomers to the craft, the vast world of photography can often feel like a minefield of technical jargon and bewildering settings. You might be scratching your head, wondering how to move beyond simple snapshots and truly weave a visual narrative of your adventures.
Well, fret no more! This comprehensive guide has been tailor-made just for you. We’re going to break down the most essential beginner travel photography tips into straightforward, bite-sized steps, helping you build confidence and hone your skills. By the time you reach the end, you’ll be armed with the know-how to snap stunning, memorable photos that truly do justice to your escapades, whether you’re wielding a smartphone or a dedicated camera.
Let’s roll up our sleeves and dive headfirst into the exciting realm of travel photography, learning how to transform your cherished travel memories into captivating visual stories.
Understanding Your Gear: The Basics for Beginner Travel Photography
Before you can start capturing those show-stopping shots, it’s absolutely vital to get a handle on the tools you’ve got in your arsenal. You don’t need to break the bank on the most expensive kit, but understanding your equipment’s capabilities will give your photography a serious leg up.
Choosing the Right Camera for Beginners
When it comes to cameras, the old adage rings true: the best one is usually the one you have with you. For budding photographers, this could be your trusty smartphone, a compact point-and-shoot, a sleek mirrorless camera, or an entry-level DSLR. Each option brings its own set of advantages and disadvantages when we talk about portability, image quality, and how much manual control you get.
Smartphones, for instance, are incredibly handy and have come leaps and bounds in their image processing prowess. Mirrorless cameras strike a sweet spot, offering a great balance of portability and image quality with the flexibility of interchangeable lenses, while DSLRs are built like tanks and provide superb control. Don’t let gear paralysis set in; focus on mastering the fundamentals with whatever camera you’ve got in your hand.
Lenses: What You Need to Know
If you’re working with a camera that allows you to swap lenses, then knowing your lens types is a game-changer. For most beginner travel photography scenarios, a versatile lens is your best bet.
- Kit Lens (e.g., 18-55mm): More often than not, this comes bundled with your camera, providing a decent zoom range that’s good for a variety of situations.
- Prime Lens (e.g., 50mm f/1.8): These lenses have a fixed focal length and are celebrated for their razor-sharpness and knack for creating that beautiful, creamy background blur (bokeh), making them fantastic for portraits and low-light conditions.
- Wide-Angle Lens: Your go-to for sweeping landscapes and grand architecture, allowing you to cram more of the scene into your frame.
To begin with, your kit lens will generally serve you well. However, if you’re keen to dip your toes into shallow depth of field and boost your low-light performance, consider investing in a fast prime lens.
Basic Camera Settings Explained
Getting a firm grasp on the exposure triangle – that’s Aperture, Shutter Speed, and ISO – is absolutely foundational. These three settings are like a well-oiled machine, working in concert to dictate the brightness and overall look of your photograph.
Read Also : Discover Instagrammable Beautiful Places Worldwide
Also Read:

- Aperture (f-stop): This controls how much light floods into your lens and, crucially, the depth of field (how much of your image is in sharp focus). A smaller f-number means more light and a beautifully blurred background.
- Shutter Speed: This dictates the duration for which your camera’s sensor is exposed to light. A lightning-fast shutter speed will freeze action dead in its tracks, while a slower one can create artistic motion blur.
- ISO: This setting determines your sensor’s sensitivity to light. Cranking up the ISO allows you to shoot in dimmer conditions, but beware, it can introduce “noise” (that grainy look) into your images.
Kick things off by playing around with your camera’s semi-automatic modes (like Aperture Priority or Shutter Priority). This will help you get a feel for how these settings influence your shots before you take the plunge into full manual mode.
Mastering Composition: Seeing Like a Photographer

Composition is, quite simply, the art of arranging all the elements within your frame. It’s safe to say it carries more weight than your camera gear when it comes to crafting truly compelling travel photography.
The Rule of Thirds: A Foundation
This is one of the most bedrock principles of composition. Picture your image neatly divided into nine equal segments by two horizontal and two vertical lines. Instead of plonking your subject smack-dab in the middle, try positioning it along these lines or, better yet, at their intersections.
Doing so creates a much more dynamic and visually engaging photograph. Many cameras and smartphones come with a handy grid overlay feature that can be a real boon for practicing this rule. Think of it as a helpful guideline, not a rigid law etched in stone, but it’s an excellent jumping-off point for beginners.
Leading Lines and Framing
Leading lines are those natural or man-made lines – think winding roads, flowing rivers, sturdy fences, or winding pathways – that effortlessly guide the viewer’s eye through your image towards the main subject. They work wonders in adding depth and drawing attention right where you want it.

Framing, on the other hand, involves using elements already present in your scene (like archways, tree branches, or windows) to create a natural “frame” around your primary subject. This clever trick adds context and pulls the viewer deeper into the photograph. Keep an eye out for these ready-made frames as you explore your travel destinations.
Symmetry and Patterns
Symmetry can be incredibly powerful, creating balanced and aesthetically pleasing images, especially when you’re shooting architecture or reflections. Seek out those perfect mirror images in water or grand, symmetrical buildings.
Patterns, whether they’re found in nature (like leaves or sand dunes) or man-made (think intricate tiles or repetitive structures), inject texture and visual interest into your shots. And here’s a tip: breaking a pattern with a unique element can often make for an even more captivating photograph.
Foreground, Midground, Background
Adding interesting elements to your foreground can give your images a wonderful sense of depth and scale, particularly in sweeping landscapes. Rather than just pointing your lens at a distant mountain, try to include a vibrant flower, a rugged rock, or even a person in the immediate foreground.
Read Also : Best Tropical Islands to Visit for Your Dream Getaway
This simple yet effective technique for beginner travel photography helps craft a more immersive experience for the viewer, making them feel as though they’re standing right there beside you.
Harnessing Light: Your Best Friend in Travel Photography

Light is the very lifeblood of photography. Getting to grips with how to use it effectively will dramatically elevate your travel photos from good to absolutely glorious.
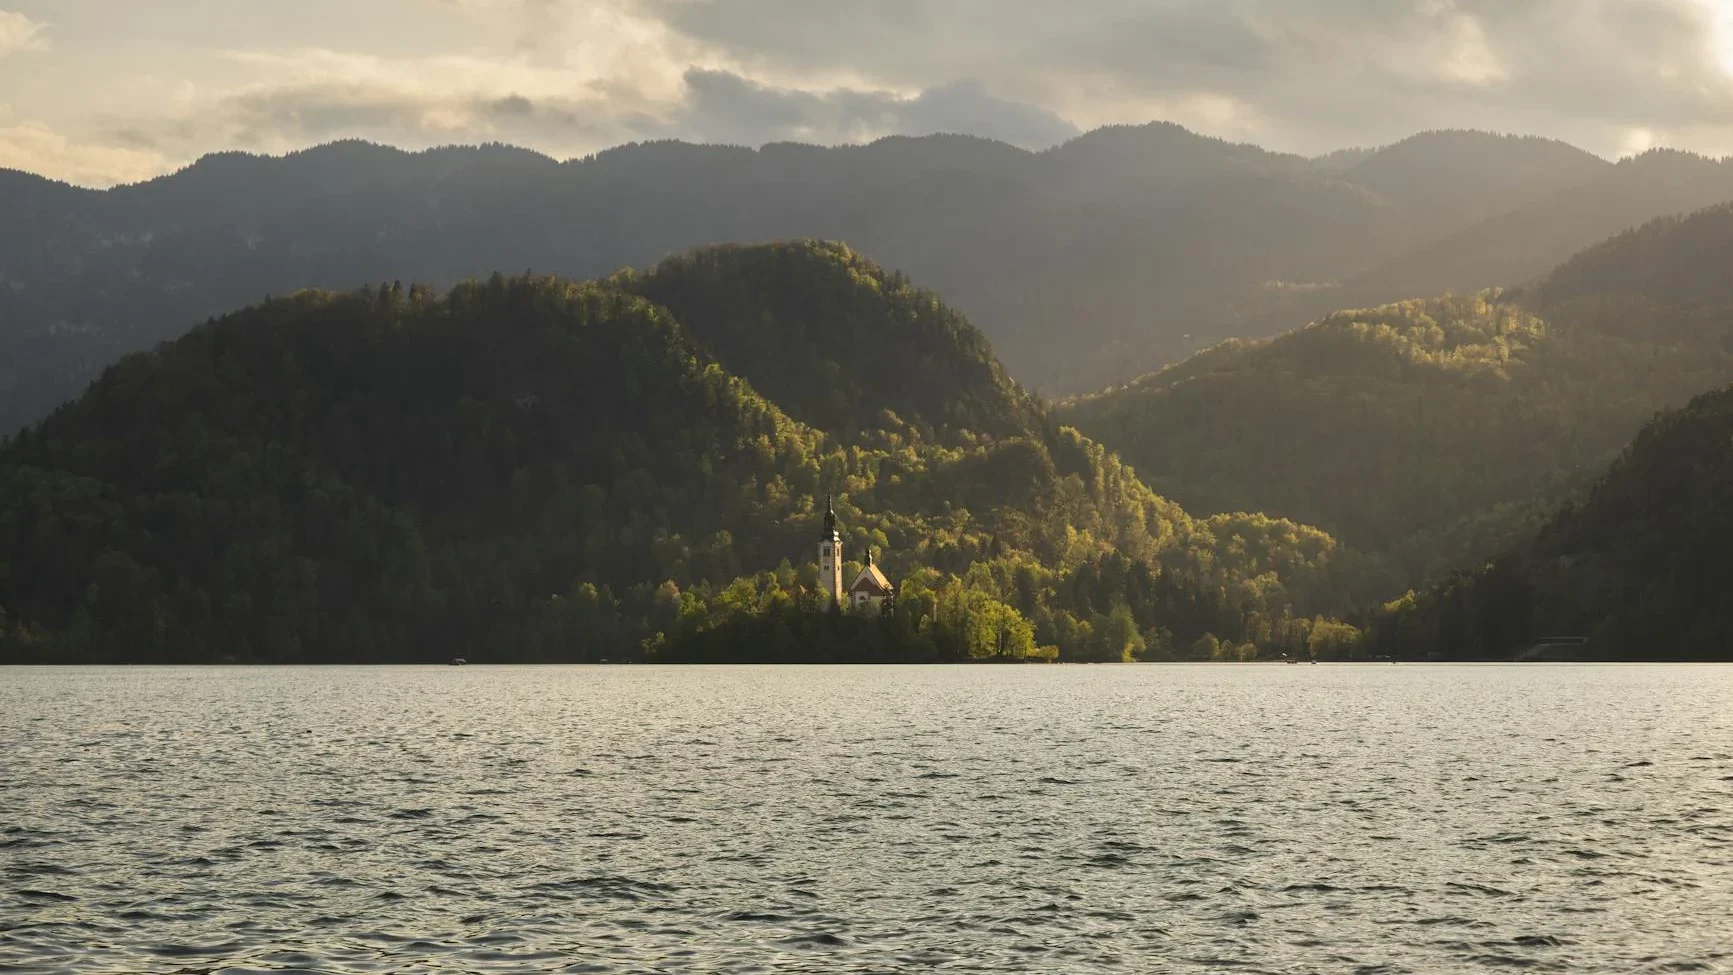
Golden Hour Magic
The “golden hour” refers to that magical period just after sunrise or right before sunset when the sun hangs low in the sky, bathing everything in a soft, warm, and wonderfully diffused glow. This light is incredibly flattering for portraits, landscapes, and bustling cityscapes alike.
Try to schedule your shooting sprees around these precious times. You’ll discover that colors pop with more richness, shadows stretch longer and softer, and frankly, everything just takes on a more enchanting aura. It truly is the sweet spot for capturing those stunning beginner travel photography shots.
Dealing with Harsh Midday Sun
The midday sun can often be a real beast, creating stark contrasts, blown-out highlights, and deep, unforgiving shadows. While it poses a challenge, it’s not an insurmountable one when it comes to getting decent shots.
Your best bet is to seek out some shade, use a reflector or a touch of fill flash to soften those harsh shadows on faces, or hunt for high-contrast scenes that can really shine in black and white. Alternatively, you can lean into that strong light to create dramatic, eye-catching silhouettes.
Understanding Backlight
Backlighting occurs when your light source is positioned directly behind your subject. This technique can be a real secret weapon, used to create striking silhouettes, add a beautiful halo of light around hair (known as rim lighting), or infuse your subject with a dreamy, ethereal glow.
To properly expose a backlit subject, you’ll often need to fiddle with exposure compensation or use spot metering to ensure your subject doesn’t end up underexposed. Don’t be shy; experiment with different angles to see how the light dances with your subject.
Storytelling Through Photography
Read Also : Underrated European Destinations: Hidden Gems
Beyond simply taking pretty pictures, truly great travel photography spins a yarn. It manages to convey the very atmosphere, emotions, and unique spirit of a place.
Capturing Local Life and Culture
Don’t just fixate on the famous landmarks; strive to capture the beating heart of your destination through its people and their daily routines. Photograph lively markets, charismatic street performers, skilled local artisans, or those candid, everyday interactions that paint a vivid picture of local life.
Always tread with respect and, whenever possible, ask for permission before snapping someone’s photo, especially close-ups. A warm smile and a simple gesture often go a long way. These unposed shots frequently turn out to be the most treasured memories of your journey.
Focusing on Details and Textures
Take the time to zoom in on the little things that give a place its unique flavor. Think intricate carvings on an ancient temple, the explosion of vibrant colors from spices in a bustling market, the rugged texture of an old stone wall, or the delicate pattern of traditional fabric.
These fine details add a rich tapestry and depth to your photographic narrative, beautifully complementing your wider landscape shots. They invite the viewer to linger and explore the scene on a more intimate level.
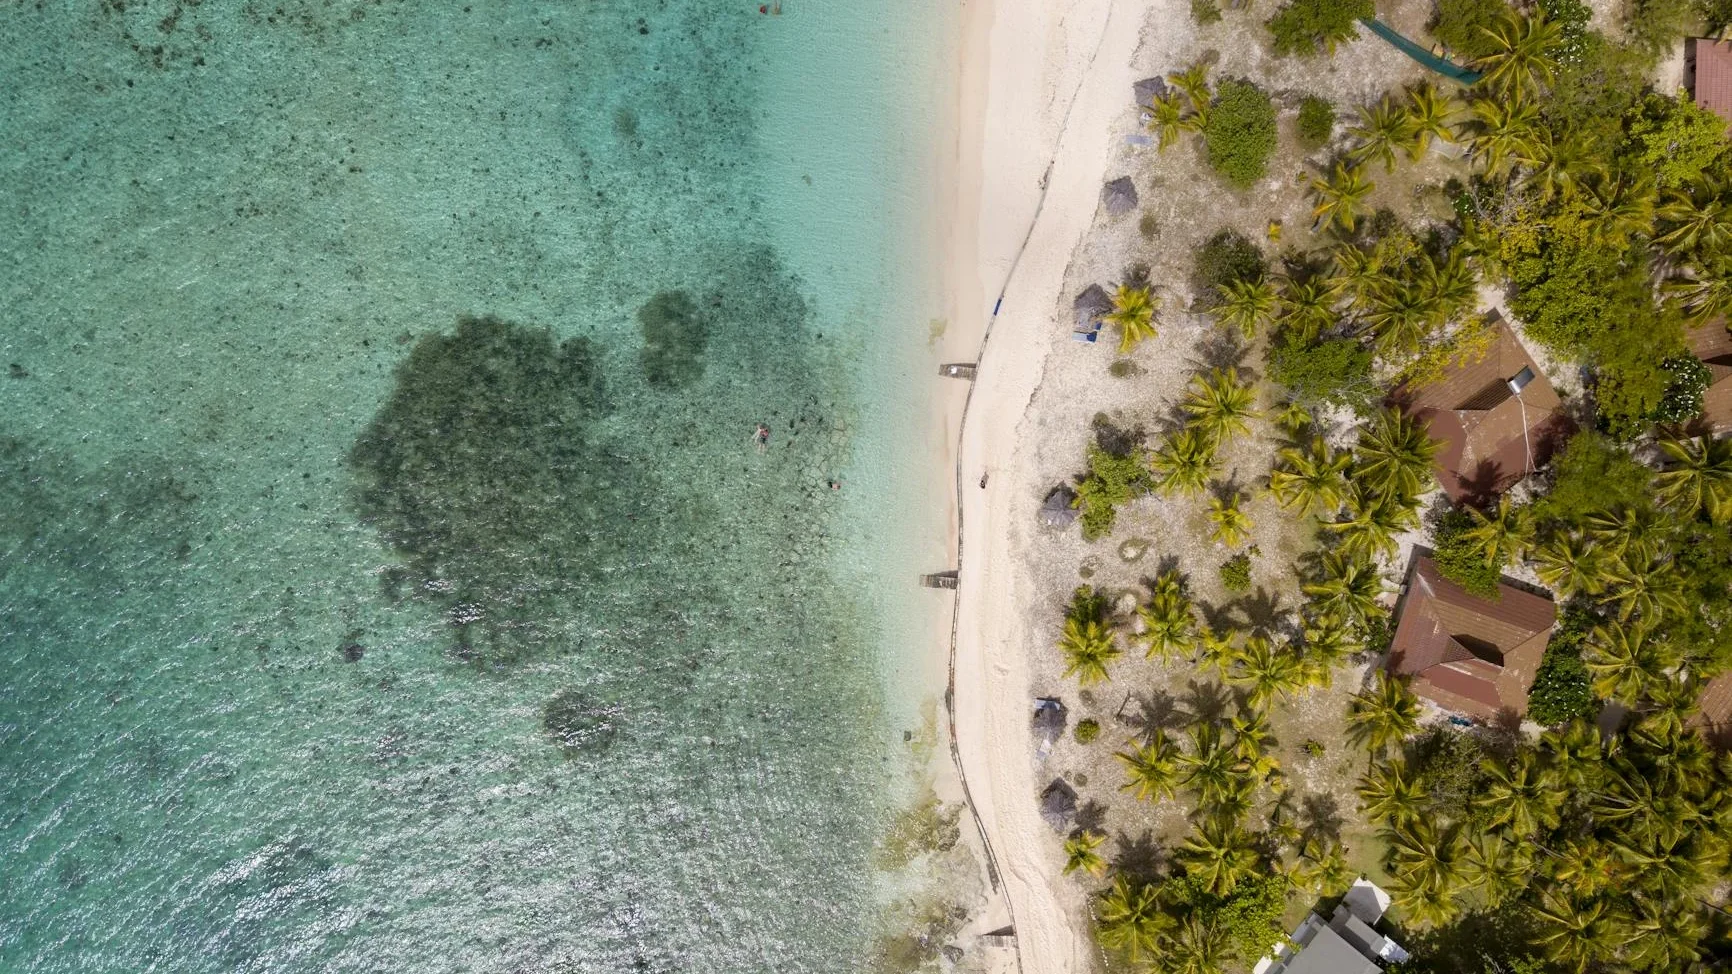
Landscapes and Vistas
Capturing breathtaking landscapes is, without a doubt, a cornerstone of travel photography. Always be on the lookout for compelling foreground elements, skillfully employ leading lines, and pay close attention to the sky above. Clouds can inject a dose of drama, while a clear sky offers elegant simplicity.
For those expansive scenes, consider stitching together panoramic shots. Remember to chase that golden hour light for the best results, and don’t ever be afraid to play around with different angles and perspectives to make your landscape photos truly stand out from the crowd.
Post-Processing: Enhancing Your Shots

Editing is an indispensable part of modern photography. It’s the stage where you fine-tune your images, iron out imperfections, and unlock their full potential. The good news is, you don’t need fancy, complex software to get started.
Basic Editing Software for Beginners
For those just starting out, there’s a plethora of user-friendly options at your fingertips:
Read Also : Affordable Luxury Travel Destinations [apc_current_year]
- Smartphone Apps: Snapseed, Lightroom Mobile, VSCO, or even your phone’s built-in editor.
- Desktop Software: Adobe Lightroom (subscription-based), GIMP (free), Darktable (free), or the basic editors often included with your computer’s operating system.
These tools empower you to make fundamental adjustments without overwhelming you with a dizzying array of advanced features. Begin with simple edits and gradually venture into more complex territory as you gain confidence.
Essential Adjustments: Exposure, Contrast, White Balance
These are the core adjustments that possess the power to transform a merely good photo into a truly magnificent one:
- Exposure: This is where you brighten or darken your image, ensuring it’s neither too washed out (overexposed) nor too murky (underexposed).
- Contrast: Adjusts the difference between the brightest and darkest areas, giving your image that desirable “pop.”
- White Balance: Corrects any color casts so that whites appear genuinely white and all other colors are true to life.
- Highlights/Shadows: Helps you recover lost detail in areas that are either excessively bright or too dark.
Even a few subtle tweaks in these key areas can make a world of difference to the final look and feel of your travel photos. These are non-negotiable beginner travel photography tips when it comes to post-processing.
Cropping and Straightening
Cropping is your secret weapon for removing distracting elements from the edges of your frame and significantly improving your composition. It can help you adhere to the rule of thirds or simply allow you to zero in more effectively on your main subject.
Straightening, on the other hand, ensures that your horizons are perfectly level and any architectural lines stand tall and true. A crooked horizon can be a huge visual distraction, so this straightforward adjustment can dramatically boost the professionalism of your shot.
Ethical Travel Photography

As a photographer, you carry a weighty responsibility to be respectful of the places and, most importantly, the people you choose to photograph.
Respecting Local Culture and Privacy
Always be acutely aware of local customs and time-honored traditions. When photographing people, particularly in sensitive cultural settings, always, always ask for permission first. A genuine smile and a few words in the local language can often work wonders.
Exercise discretion, avoid intruding on private moments, and never make anyone feel uncomfortable. Your ultimate aim is to capture, not to exploit.
Leaving No Trace
This vital principle extends wholeheartedly to photography. When you’re shooting in natural environments, stick to marked paths, refrain from disturbing wildlife, and make sure to leave the area exactly as you found it. Under no circumstances should you damage or alter any part of the environment just for the sake of a photo.
Read Also : Best Travel Apps for International Trips [apc_current_year]
Be a responsible traveler and an ethical photographer. The beauty you capture should remain unspoiled for others to cherish and enjoy long after you’ve gone.
Safety and Security for Your Gear
Your camera gear represents a significant investment. Protecting it from both theft and the unpredictable elements is absolutely crucial, especially when you’re out exploring the world.
Protecting Your Camera from Elements
The weather, as we all know, can be a fickle beast. Always carry a simple rain cover for your camera – even a humble plastic bag can do the trick in a pinch. Shield your gear from sand, dust, and extreme temperatures. For beach excursions or rainy treks, a waterproof bag comes highly recommended.
Keep a lens cloth and an air blower close at hand to banish dust and smudges from your lens and sensor. A clean lens, after all, is the secret to sharper photos.
Keeping Your Gear Secure
When you’re traveling, aim to keep your camera bag on the down-low. Steer clear of flashy bags that practically scream, “Expensive gear inside!” Consider opting for a camera bag that doesn’t immediately give away its contents. Always keep your bag tethered to you, especially in crowded areas where pickpockets might be lurking.
Make it a habit to back up your precious photos regularly, either to cloud storage or an external hard drive. Losing your irreplaceable memories would be a far bigger blow than losing the gear itself. It’s also wise to look into travel insurance that specifically covers your photography equipment.
Practice Makes Perfect
The single best way to polish your travel photography skills is to simply keep on shooting. Don’t sit around waiting for that once-in-a-lifetime trip to get your practice in.
Experimenting with Different Settings
Never be afraid to try new things. Shoot in varying light conditions, play around with different camera settings, and give new compositional techniques a whirl. The more you experiment, the quicker you’ll learn what truly works and what falls flat.
Challenge yourself: try taking 10 photos of the very same subject using different angles or settings. This kind of exercise really helps to build your visual library and sharpen your problem-solving skills behind the lens.
Reviewing Your Work and Learning
After a shooting session, set aside some time to thoroughly review your photos. Cast a critical eye over them: what do you love, and what could be improved? What hit the mark? What missed? And most importantly, why?
Read Also : Travel Hacks That Save Money: Smart Tips for Budget Trips
Learn from your missteps and consciously apply those lessons to your next photo shoot. Sharing your work with a trusted friend or an online community can also provide invaluable feedback and fresh perspectives.
Essential Accessories for Travel Photography
While gear certainly isn’t the be-all and end-all, a handful of well-chosen accessories can significantly elevate your travel photography experience.
Memory Cards and Batteries
Always, always pack spare, fully charged batteries and a stack of extra memory cards. There’s nothing worse than running out of juice or storage just as a perfect photo opportunity presents itself. Label your cards clearly to keep tabs on what’s been used.
It’s also a smart move to carry a portable power bank for topping up camera batteries or your phone on the go. This is, hands down, one of the most practical beginner travel photography tips you’ll ever receive.
Tripods and Stabilizers
A lightweight travel tripod is an absolute godsend for low-light photography, long exposures (think silky smooth water or mesmerizing star trails), and generally achieving tack-sharp images. It also comes in handy for self-portraits or getting everyone in the group shot.
For those venturing into video, a gimbal or handheld stabilizer can work wonders, smoothing out shaky footage and giving your travel videos that polished, professional look.
Cleaning Kits
Dust and unsightly smudges on your lens can quickly ruin an otherwise perfect photo. A basic cleaning kit should include a trusty lens pen, a soft microfiber cloth, and an air blower. A word to the wise: never use your shirt to clean your lens, as it can easily scratch that delicate coating.
Keeping your gear spotless not only ensures optimal image quality but also helps prolong the life of your valuable equipment.
Overcoming Common Challenges
Every photographer, no matter their skill level, runs into challenges. Here’s how you can tackle some of the most common hurdles beginners face.
Blurry Photos
Blurry photos are often the result of a shutter speed that’s simply too slow for the action or for handheld shooting, or perhaps incorrect focus. To nip this in the bud, either crank up your shutter speed, deploy a tripod, or make sure your camera is properly locked onto your subject.
Read Also : How to Travel the World on a Budget [apc_current_year]
It’s also worth checking your camera’s autofocus settings. Sometimes, switching from continuous autofocus to single-shot autofocus can be a lifesaver when your subject isn’t going anywhere fast.
Over- or Underexposed Images
If your photos are coming out either too bright or too dark, it’s time to fine-tune your exposure triangle settings (aperture, shutter speed, ISO). Make use of your camera’s exposure compensation (often a +/- button) to quickly brighten or darken an image on the fly.
Take the time to learn about different metering modes (like evaluative, center-weighted, or spot metering) to better inform your camera’s exposure decisions, especially when you’re grappling with tricky lighting conditions.
Lack of Inspiration
It happens to the best of us. When you find yourself in a creative rut, try shaking things up by changing your perspective. Get down low, climb up high, or really zero in on details you might have overlooked. You could even try focusing on a specific theme, such as colors or textures, for a whole day.
Sometimes, simply putting your camera down for a spell and fully immersing yourself in the moment can reignite that creative spark. Browse photos from other travel photographers for inspiration, but always strive to unearth your own unique vision.
Conclusion
Embarking on your personal journey into travel photography is, in itself, an exhilarating adventure. By getting to grips with your gear, mastering the fundamental rules of composition, and skillfully harnessing the power of light, you’ll be well on your way to capturing truly unforgettable moments. Always remember that the most potent beginner travel photography tips boil down to consistent practice, a healthy dose of patience, and a genuine passion for telling stories.
Don’t let technicalities tie you up in knots; instead, focus on seeing the world around you through the discerning eye of a photographer. Experiment with settings, try out different angles, and always, without fail, be respectful of the places and people you encounter. The ultimate goal isn’t just to snap a picture, but to craft a visual narrative that effortlessly transports you back to that cherished moment every single time you gaze upon it.
So, go on, pack your bags, make sure those batteries are fully charged, and step out with confidence. Armed with these foundational tips, you’re perfectly poised to transform your travel experiences into a stunning collection of photographic memories. Happy shooting!
FAQ
The single most important piece of advice is to put your focus squarely on composition and light, rather than merely pointing and shooting. Get to grips with the Rule of Thirds and make a point of seeking out the "golden hour" for truly spectacular results. On top of that, always carry spare, fully charged batteries and empty memory cards to ensure you never miss a beat.
Absolutely not! While pricier cameras do offer more bells and whistles and generally perform better in low light, a modern smartphone or an entry-level mirrorless/DSLR camera is perfectly capable of producing jaw-dropping travel photos. Your understanding of composition, light, and the art of storytelling holds far more weight than the hefty price tag of your gear.
To give your travel photos that professional sheen, concentrate on mastering the exposure triangle (aperture, shutter speed, ISO), employing robust compositional techniques like leading lines and framing, shooting during optimal lighting conditions (the golden hour is your friend!), and embracing basic post-processing to enhance colors and contrast. Cultivating a consistent style across your work also goes a long way in achieving a professional look.
Common pitfalls for beginners include neglecting the importance of good light, poor composition (such as centering subjects without a clear purpose), failing to back up photos regularly, forgetting to clean their lenses, and neglecting to ask for permission when photographing people. Tackling these common blunders will significantly elevate your beginner travel photography game.
Popular Posts


Embracing Spiritual Growth Through Travel and Exploration
Travel is more than just seeing new places; it's a profound journey into oneself. This article explores how embracing travel and exploration can significantly contribute to your spiritual growth, offering unique perspectives and transformative experiences.

